


If you’re like me, you love cats. You could live, eat, and breathe cats. Well, ok, definitely not eat them, but what about drawing them? When you spend so much time admiring their angular faces, furry bodies, and expressive tails, you would think it would be simple to take the millions of feline images stored in your brain and transfer them onto the page, but unfortunately for most of us, it doesn’t quite work that way.
But by following a few basic guidelines, even if you produce a piece of art worthy of the Louvre, we should have you creating drawings of cats that you’ll be proud to hang on your walls—or at least on the fridge!

Before You Start
For starters, you’ll want to make sure you have everything to create your feline masterpiece, and don’t be afraid to make mistakes along the way! Here’s a list of things you’ll need:

Paper
Any size, type, or color will do, but discarded printouts are great for initial sketches. As you become more confident, investing in some sketchbooks with quality paper can make all the difference in your art.
Pencils & Sharpener
Pick up some pencils in a range of hardnesses. I would suggest having at least a couple of 2H, 2B, and 4B pencils. Also, you don’t want the frustration of using a blunt instrument, so make sure you have a pencil sharpener as well.
Eraser
A quality eraser means less smudging, so it’s crucial to have one within reach.
Ruler
You might be thinking that cats don’t have a lot of straight lines, and you’re right, but you’ll need a small one for marking out the proportions.
Colors
Since we’ll mostly be working in shades of gray, this isn’t necessary, but it’s never too soon to invest in a good set of coloring pencils.
Fine Line Pen
This is for going over your drawing once you’re happy with the result. A set with different sizes is great for drawing.
Inspiration
Surround yourself with any cat pictures, figures, or photos that inspire you. The problem with drawing a living, breathing animal is that they have the tendency to get bored and wander off when you’re trying to draw them. If you have a particular feline in mind that you’d like to draw, take lots of photos of them in different positions, and don’t forget to take a lot of close-ups of their face!
Get Comfortable
As long as you have a flat surface where you can spread out your supplies, good lighting, and a comfy chair, you’re ready to draw. If you have real-life feline inspiration, be aware that they may not pose for you, but they will absolutely try to knock over your pencils, so keep this in mind if they’re in the room with you!

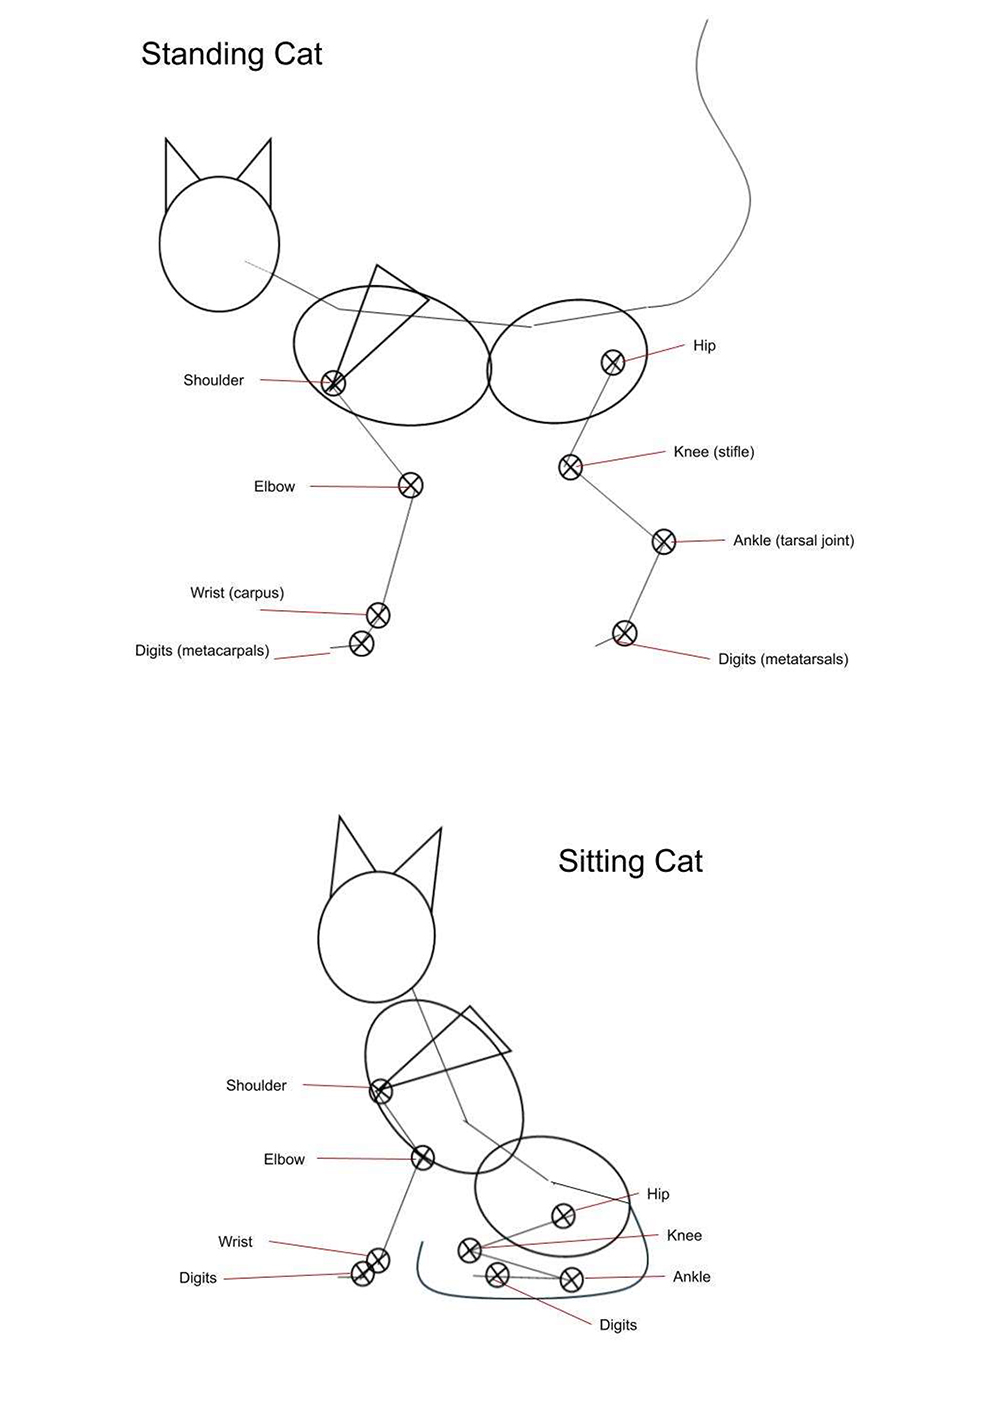
A Brief Anatomy Lesson
I am a vet, not an artist, so my strengths lie in understanding feline anatomy and function, but this can be a huge help when it comes to getting the proportions and angles right on your drawing. If you’re aiming to create a realistic feline portrait or an adorable cartoon cat, having a grasp of how and where joints and other features should be can make all the difference between an amateur doodle and a great drawing.
The following images give you a very basic idea of the anatomy and joints of the feline limbs. This will help you get a sense of the direction of movement each joint will be capable of, and they can act as a guide when working out how to position your cat.
You can download the PDFs of these templates here to use until you feel more comfortable with proportions and positioning.
There are lots of different breeds out there with some variations (but not quite so diverse in shape and size as dogs!), but once you get the hang of it, the basics are easy to change to suit whichever breed is your favorite.

Drawing Faces
Like the sketches above, these images can help you work out where to position your cat’s facial features. One of the most common mistakes is positioning the eyes too high. Remember that nothing in nature is perfectly symmetrical, so these sketches are just to help you get your proportions and placements right. Download the printable PDF for the instructions below here.
Front-Facing Head
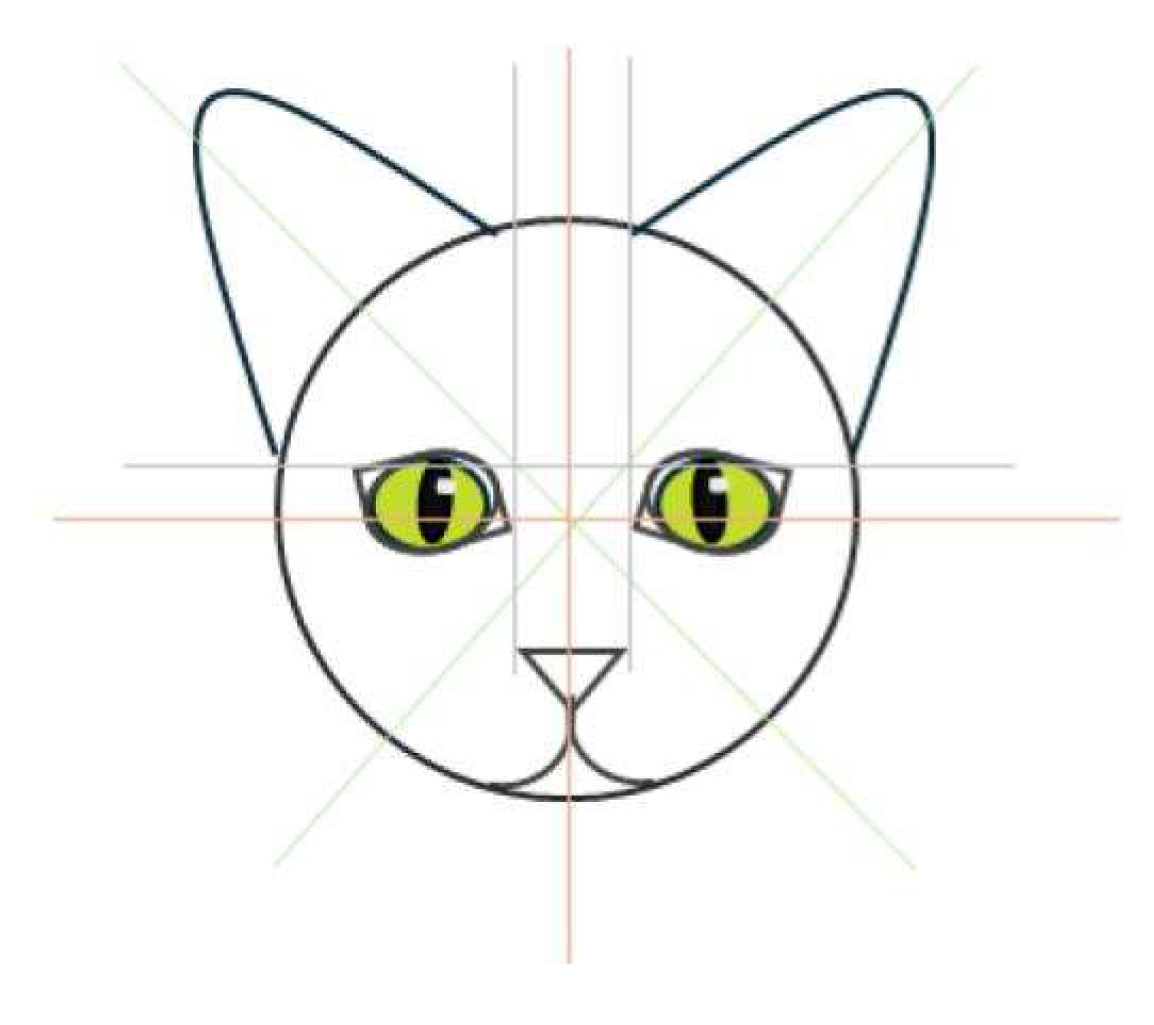
- Draw a circle and divide it into eight equal sections through the center.
- The eyes will roughly be level with the horizontal center line.
- Draw a line running across the top of the eyes and the inside corner of the eyes. These will give you the outer corners of the nose, the top border of the ears, and the outer corner of the ears.
- The lines running at 45 degrees give you the approximate midline of the ears.
Side-Facing Head
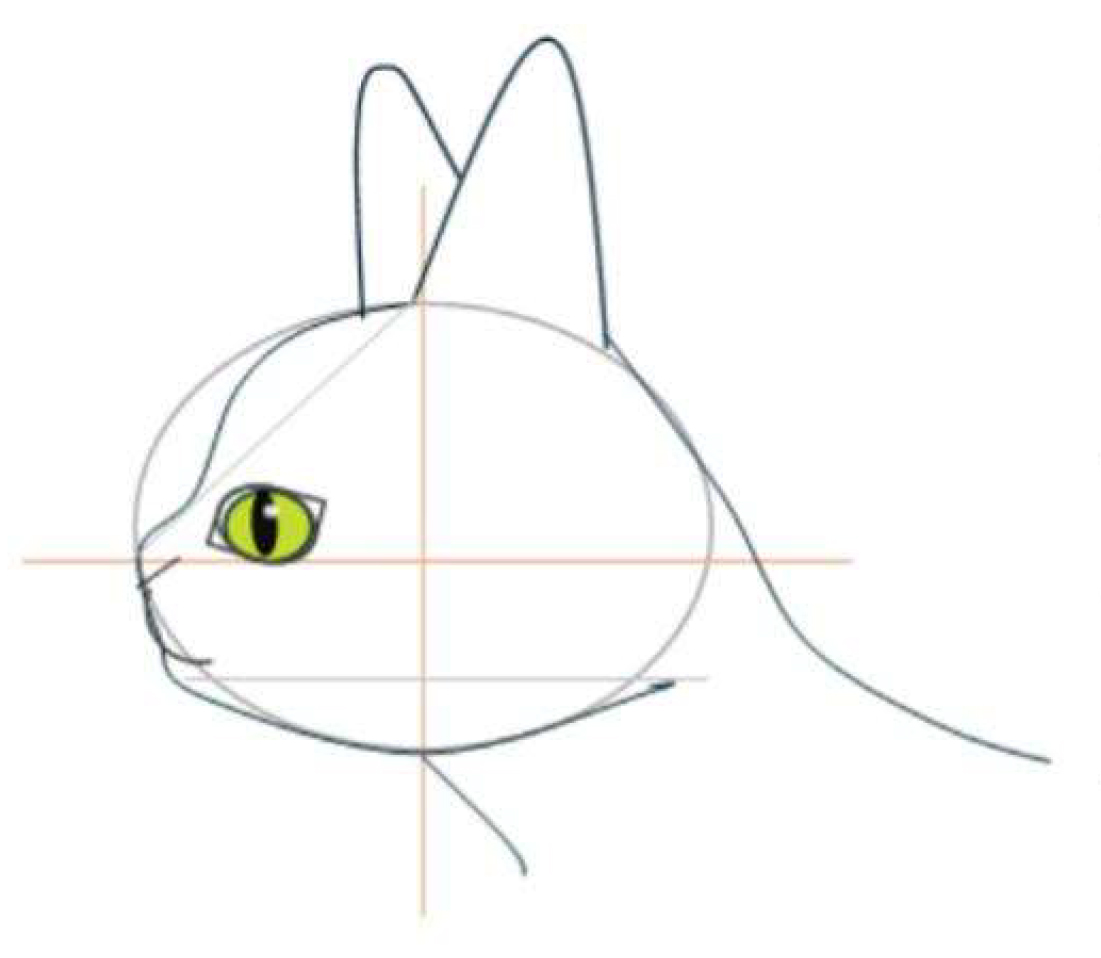
The side view is a bit trickier and will depend on the face shape of the individual cat or breed you are drawing, but similar principles apply to getting your positioning in place.
- Start with an oval and divide it into quarters.
- The bottom of the eye should roughly be level with the horizontal center line, approximately halfway between the center and outer edge of the oval.
- Draw a line between the points where the vertical and horizontal lines cross the oval. This gives you the front edge of the ear and the angle of the nose.
- Draw your mouth with a small chin, which will follow the lower curve of the oval.
- Use the horizontal and vertical lines to guide your neck attachment, as well as a line running from the chin to give the back outline of the face.
- Don’t forget to draw the other ear!
Now that you have some basic templates to help guide you through our feline anatomy, let’s get to the fun bit! Below, there are some basic steps to follow to draw a standing and sitting cat, and you can also follow along with the video here.

How to Draw a Standing Cat
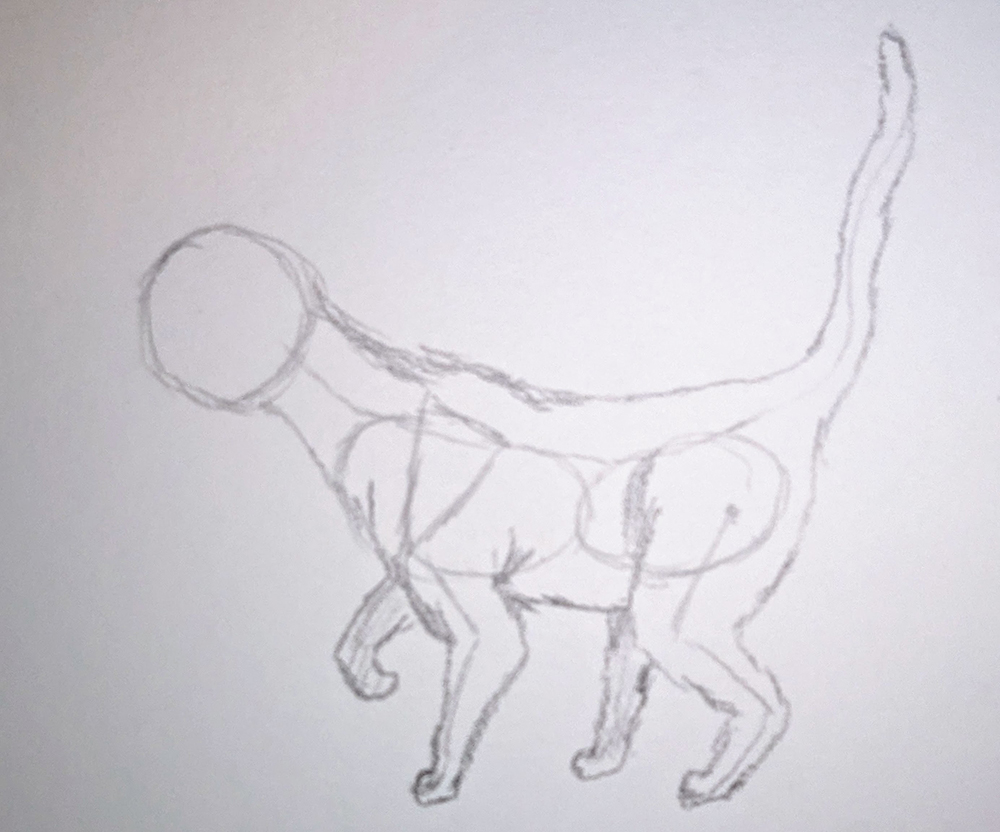
1. Start With the Basics – Lines & Shapes
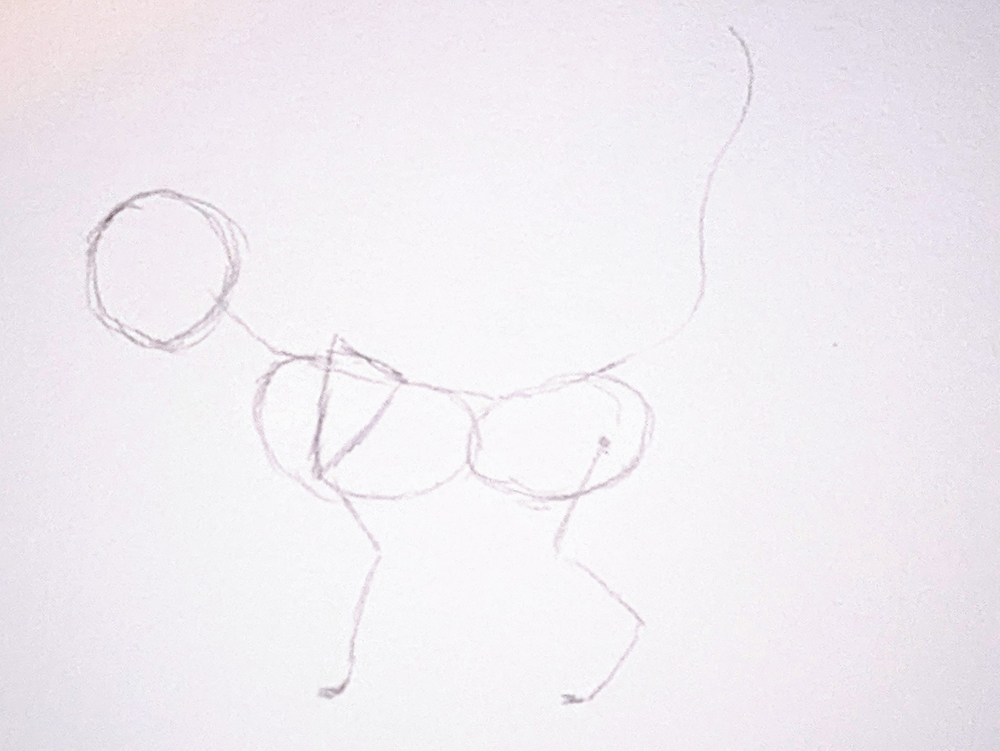
Use the template to get your basic outline and shape. The shoulder blade is an important feature in cats, as it tends to be quite prominent over their backline. The hind leg should start below the line of the spine.
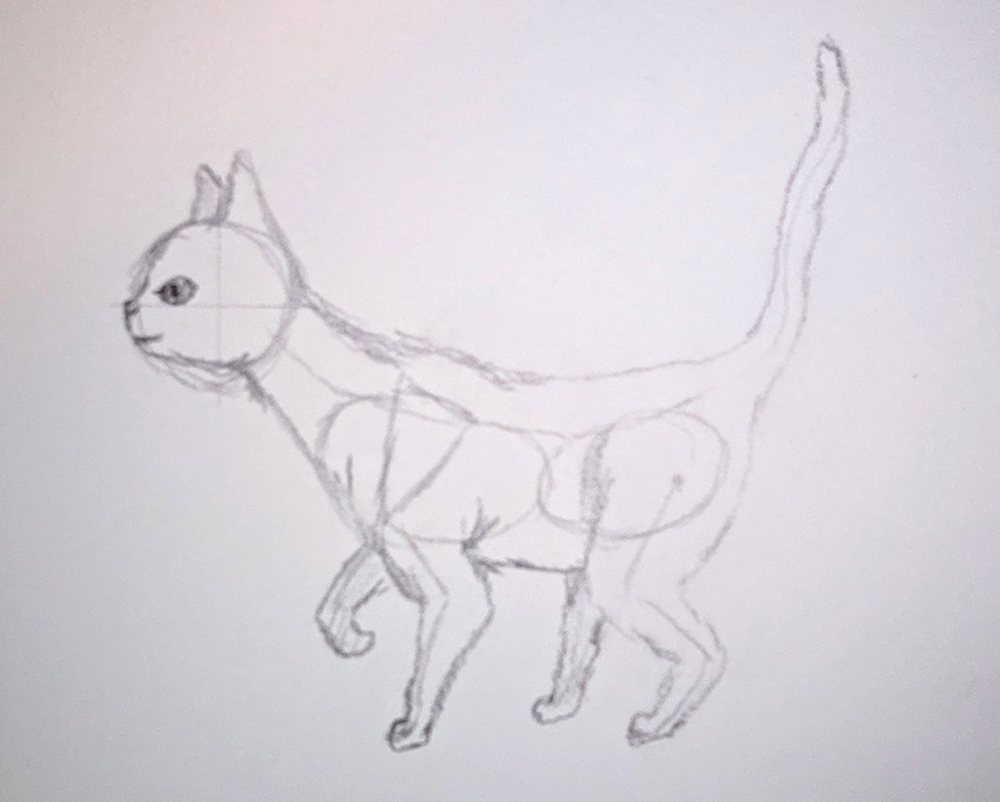
2. Create the Outline
Use soft, short pencil strokes rather than a long, continuous line. It is much easier to get your shape right by doing this, and it gives the outline a more natural appearance (notice how the shoulder blade is featured in the outline).
Draw the legs on the other side too, using shading to give an idea of depth.
3. Add Details
Once you’re happy with your outline, you can use your 2B pencil to make your outlines stand out more, but keep using short strokes so your kitty looks soft.
Use your ruler to divide your cat’s head into quarters. It doesn’t need to be precise, but this is going to help us place our facial features.
We’ll use the side-facing head for this drawing.
Use the lines as a guide to position the eyes and ears. Different breeds will have slightly different face shapes, so use a little bit of judgment for the length of the face and the roundness of the head.
4. Apply the Finishing Touches
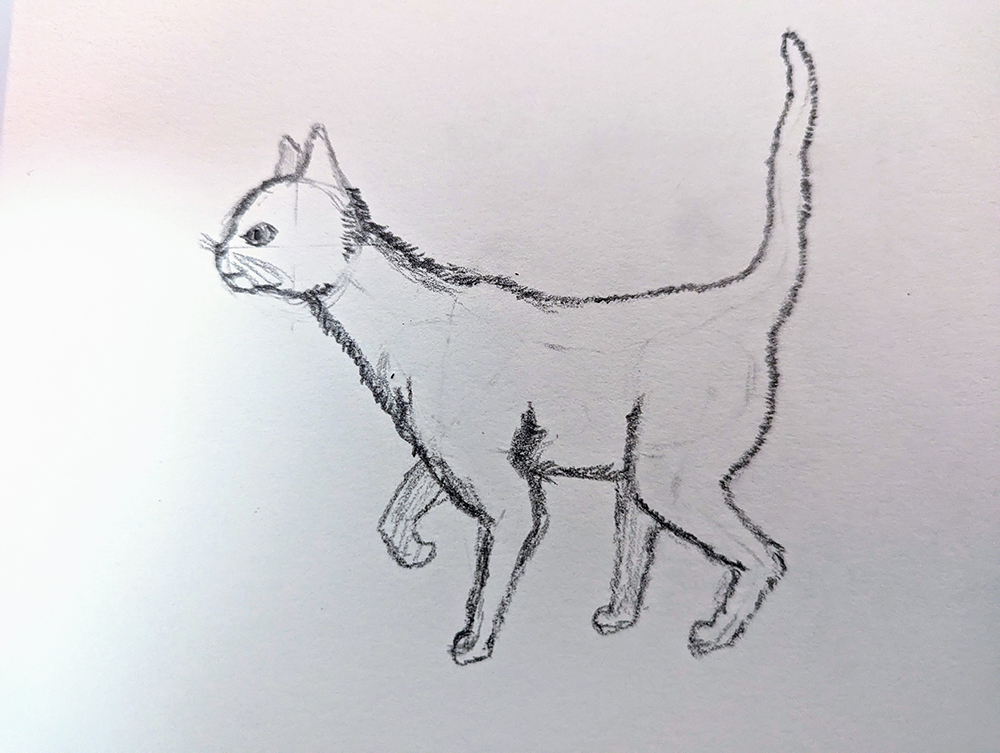
Go over the outline of your cat with tiny strokes to give the outline a soft appearance. I’m giving this cat a short coat, so I don’t want to draw long fur, but this gives a furry look without altering the silhouette.
5. Add a Splash of Color
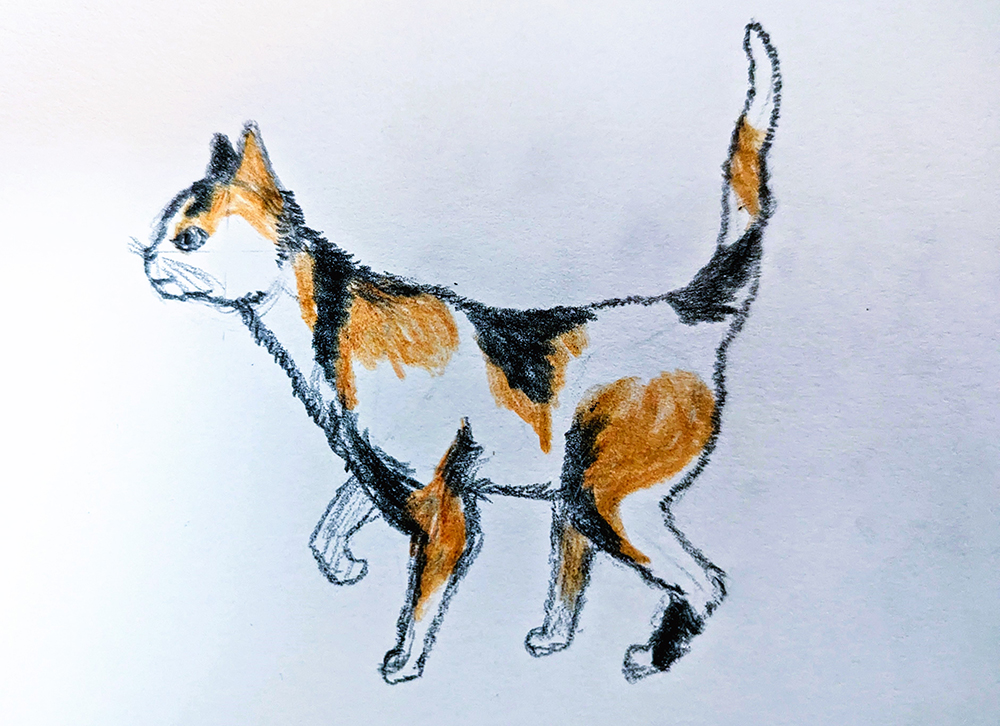
You can finish your drawing at the pencil stage, but I fancied making mine a calico! With thousands of different coat possibilities out there, you’ve got plenty of options to choose from.
Next up we’ll try the sitting cat. The principles are all the same, but it can be slightly trickier to get the angles right.

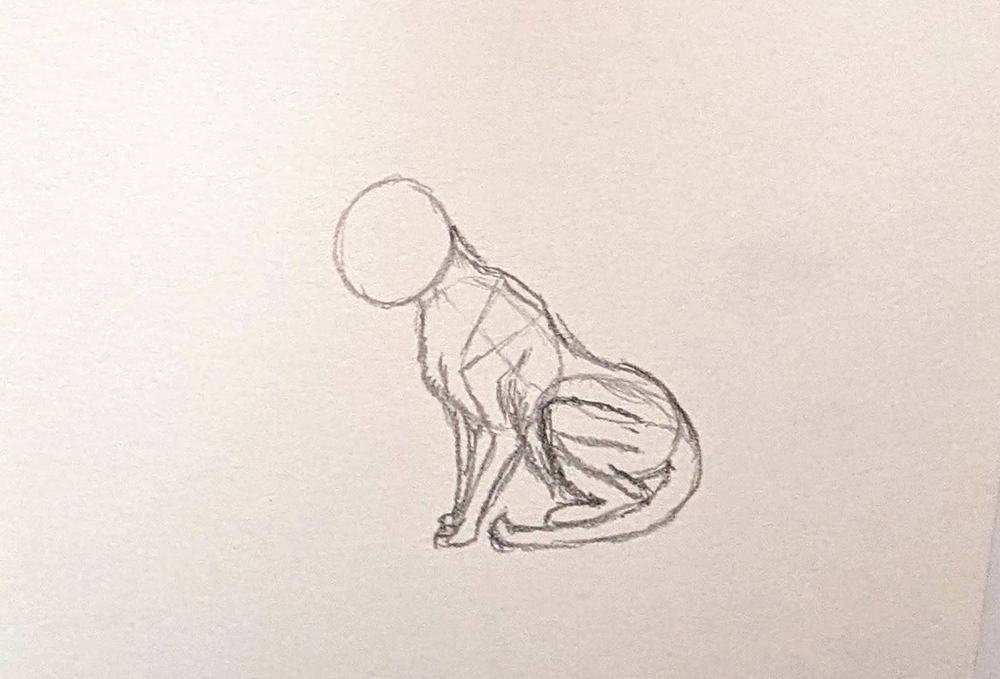
How to Draw a Sitting Cat
1. Start With the Basics – Lines & Shapes

Just like you did before, start by drawing the basic lines and shapes that make up the overall outline of your cat.
Step 2 – Creating the Outline
Keep drawing more lines and details until you get a better outline of your cat.
2. Add Details
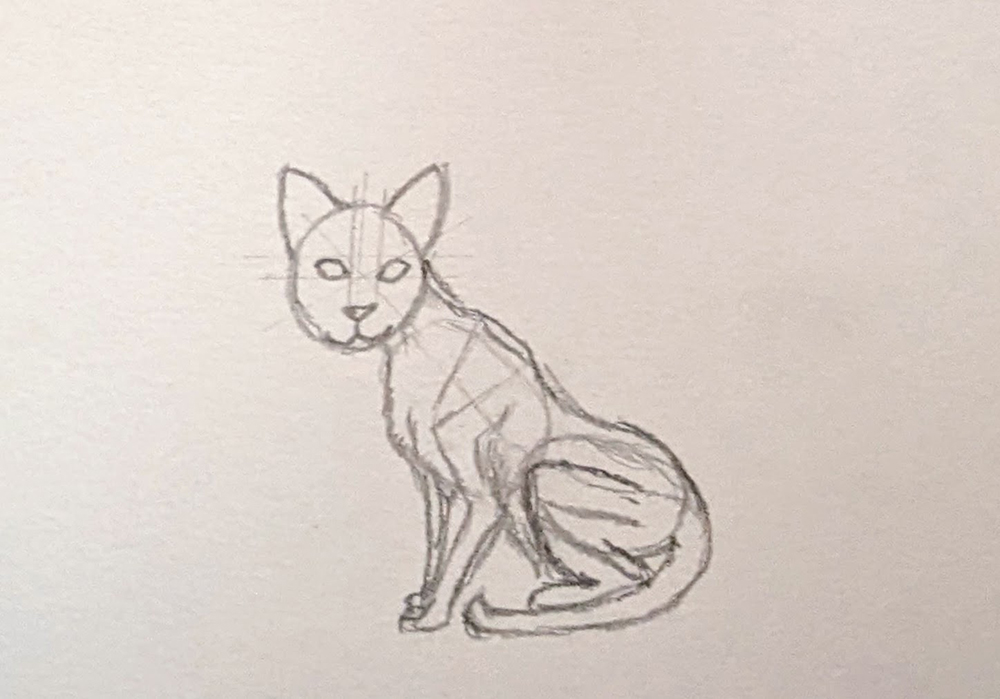
Remember from the template that the front-facing face is a bit more complex, so start by lightly dividing the circle (head) into eight equal sections. Then, use the lines to guide the placement of the eyes, ears, and nose.
Once you’ve finished with all your guide markings, carefully erase them so you are just left with your outline.
3. Add the Finishing Touches
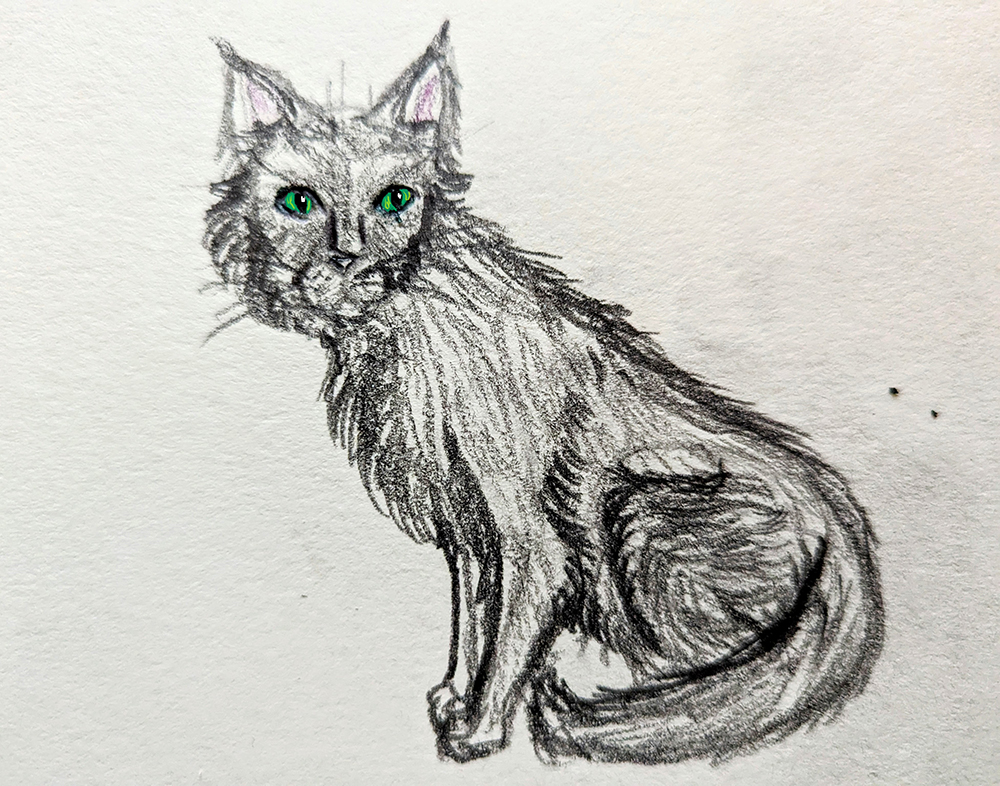
I thought my kitty was looking a bit skinny, so I decided to give mine a long coat. When drawing the strokes for the coat, use the direction of the fur to help outline the anatomy.
I’ve used the 2B and 4B pencils to get a soft, dark finish, and apart from a hint of green in the eyes and pink in the ears, I’ll leave it at that
Get Creative!
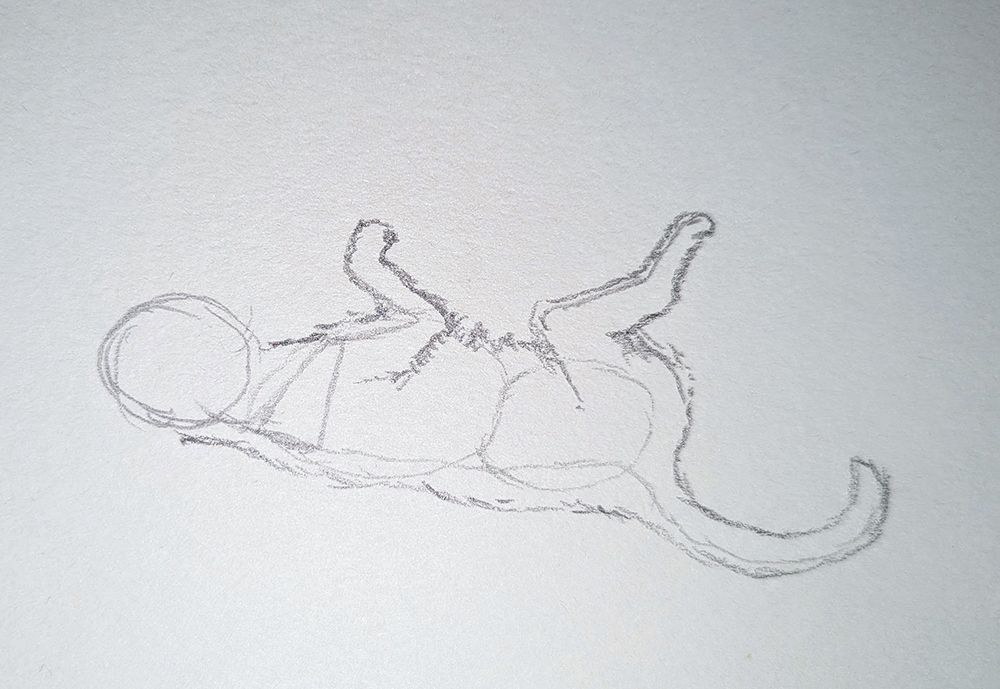
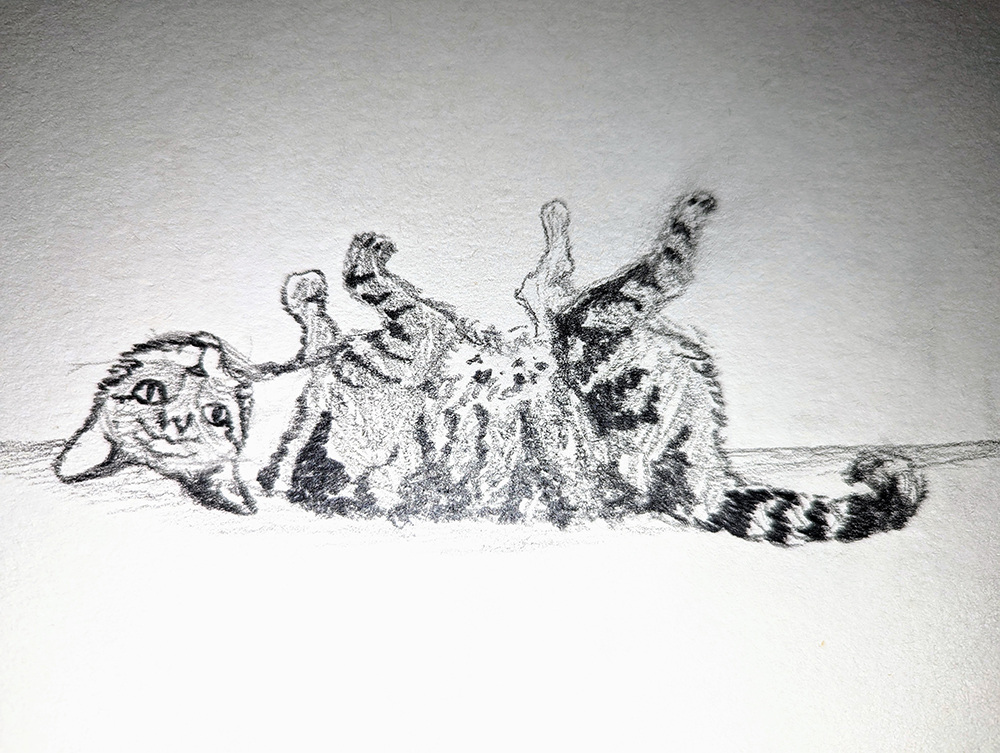
Once you’ve got the hang of the proportions, placement, and angles, you can do away with the templates or even adapt them to create something a bit different. I felt inspired by my cat Cyril and his ability to make everything look comfortable!

Final Thoughts
Drawing can be easy when you break it down into simple steps and use basic anatomy to get your cat’s shape and positioning looking right. Don’t forget to trust yourself! If I can do it, you can as well.
Featured Image Credit: kholywood, Shutterstock
Contents
- Before You Start
- Get Comfortable
- A Brief Anatomy Lesson
- Drawing Faces
- How to Draw a Standing Cat
- 1. Start With the Basics – Lines & Shapes
- 2. Create the Outline
- 3. Add Details
- 4. Apply the Finishing Touches
- 5. Add a Splash of Color
- How to Draw a Sitting Cat
- 1. Start With the Basics – Lines & Shapes
- Step 2 – Creating the Outline
- 2. Add Details
- 3. Add the Finishing Touches
- Get Creative!
- Final Thoughts


